PySide常用控件
约 3405 个字 937 行代码 20 张图片 预计阅读时间 23 分钟
本着案例教学的风格,本节我们要设计这样的界面:
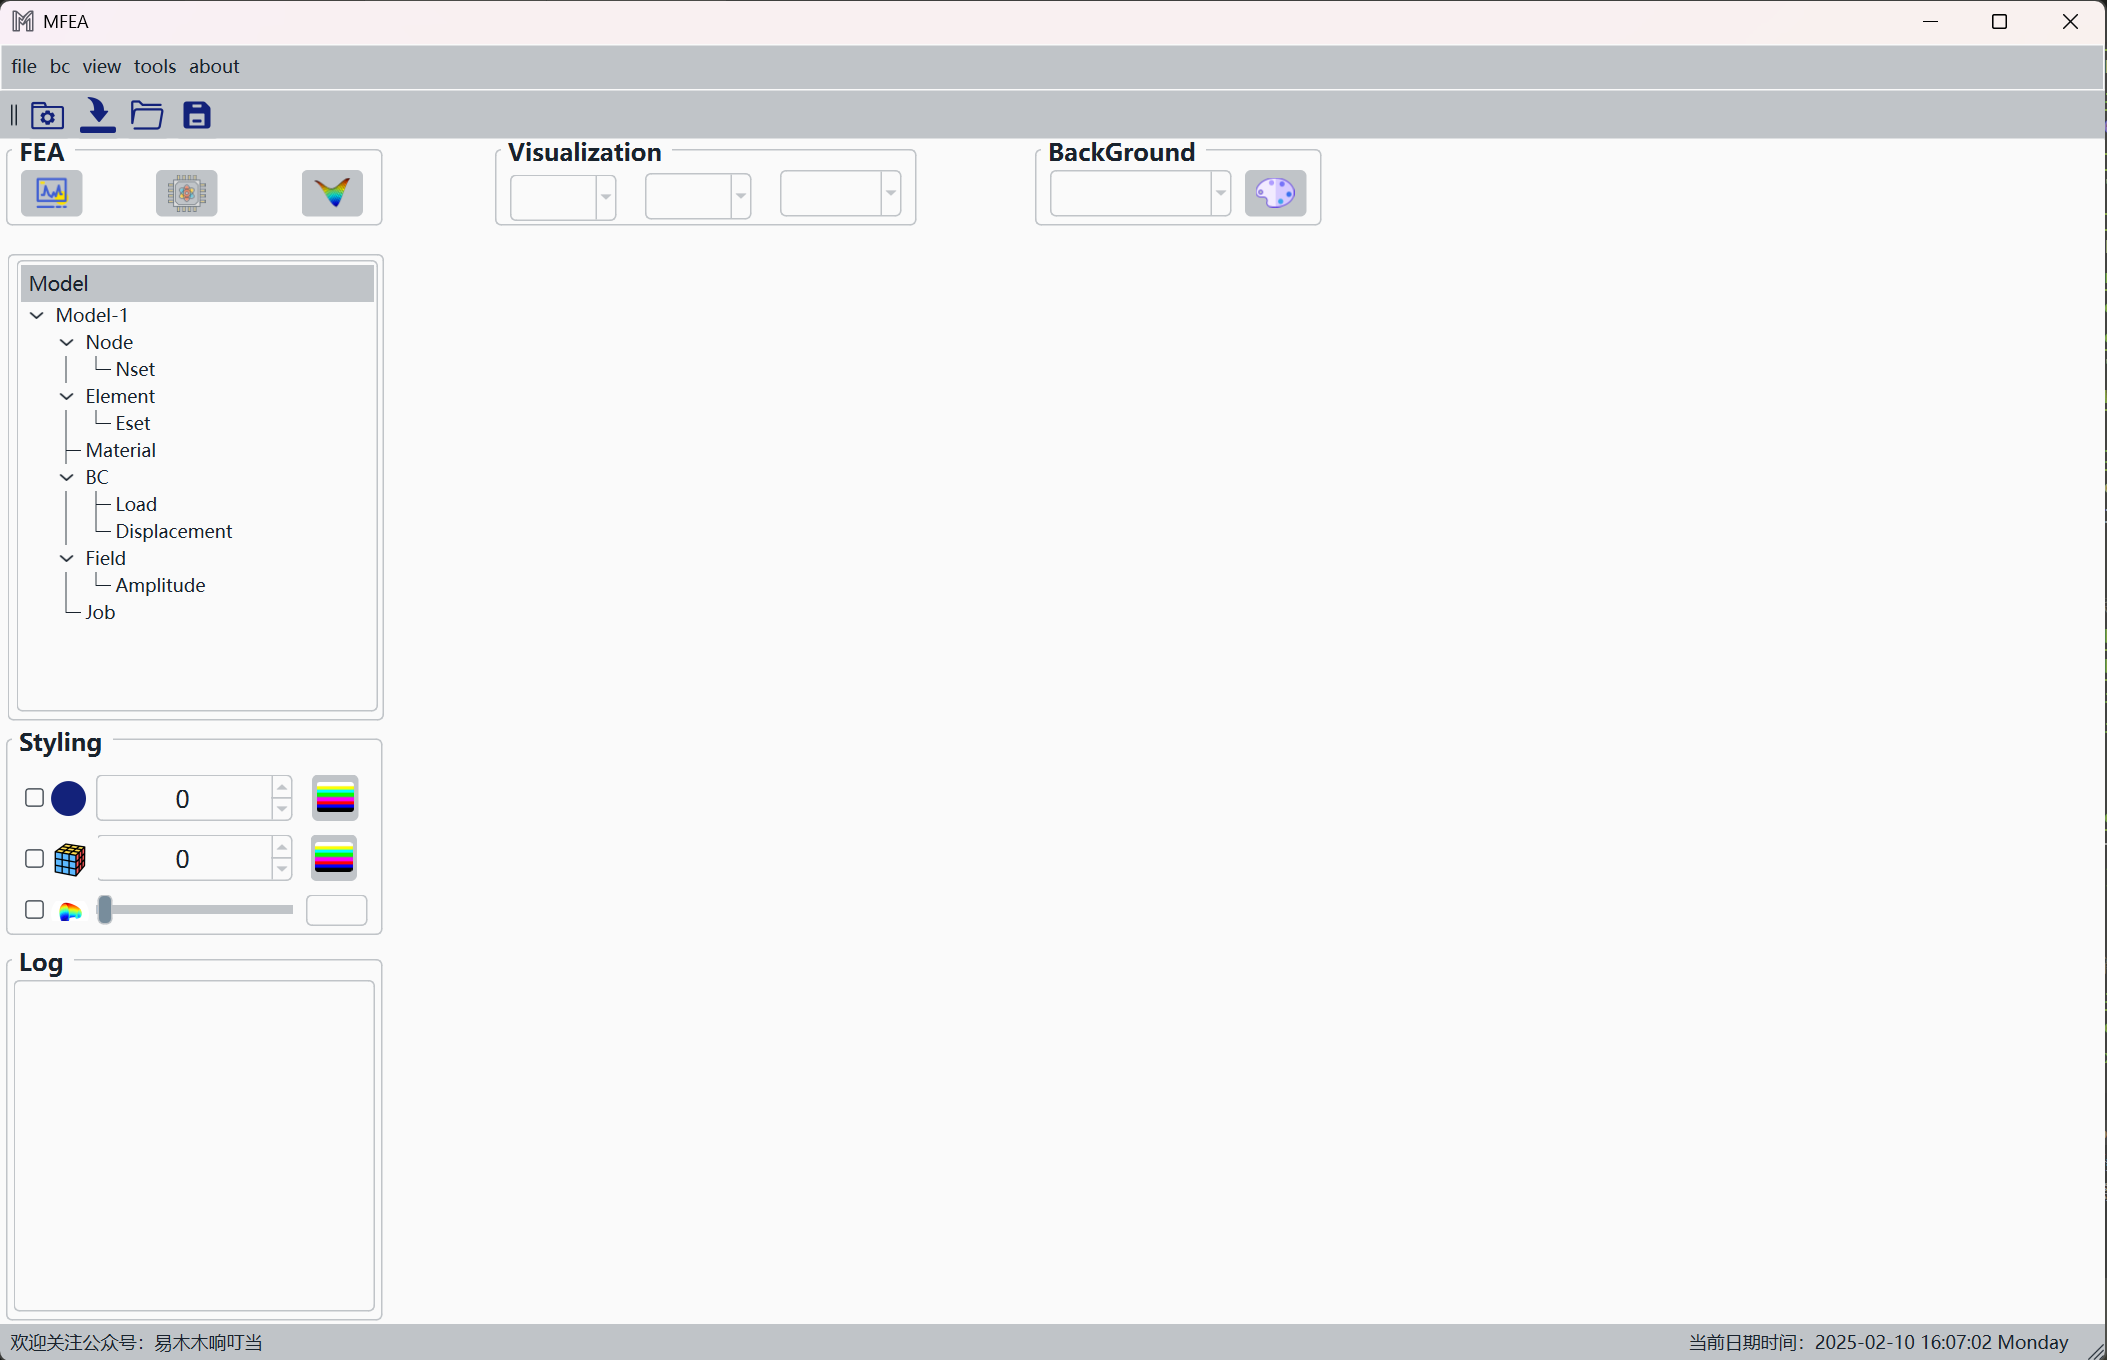
该界面涉及的控件有:
- 按钮QPushButton
- 下拉框QComboBox
- 文本显示区域QTextBrowser
- 勾选框QCheckBox
- 滑动条QSlider
- 单行文本QLineEdit
- 数字输入控件QSpinBox
- 树结构QTreeWidget
- 工具栏QToolBar&动作编辑器QAction
接下来,挨个介绍,介绍的过程中,不会细致讲述其中实现原理,水平确实有限,只能说明功能是如何实现的,想要弄明白原理,可翻阅相关书籍或官方QT网站。
按钮QPushButton
QPushButton是一个常见的按钮控件,用户可以点击它来触发某些操作。
基本使用
现在创建一个按钮,逻辑是:点击按钮->打印文本
from PySide6.QtWidgets import QApplication, QWidget, QPushButton, QVBoxLayout
import sys

class MainWindow(QWidget):
    def __init__(self):
        super().__init__()

        self.setWindowTitle("QPushButton 示例")

        # 创建按钮
        self.button = QPushButton("点击我")

        # 连接信号槽
        self.button.clicked.connect(self.on_button_clicked)

        # 布局
        layout = QVBoxLayout()
        layout.addWidget(self.button)
        self.setLayout(layout)

    def on_button_clicked(self):
        print("按钮被点击了!")

if __name__ == "__main__":
    app = QApplication(sys.argv)
    window = MainWindow()
    window.show()
    sys.exit(app.exec())
Tip
为了演示方便,上面是从代码中创建按钮,实际操作可以在qtdesigner中拖动按钮到合适的位置。
重点是self.button.clicked.connect(self.on_button_clicked),这行语句就将点击按钮事件.clicked通过.connect联系到了我们设置好的执行语句on_button_clicked,注意到这里在使用方法之前都加入self.。
通过上面解释的这个语句,就可以实现当用户点击该按钮时,触发on_button_clicked方法。按钮上的图标、文本样式也可以通过qtdesigner界面进行添加,过程比较简单,在右侧 属性编辑器 中进行设置即可
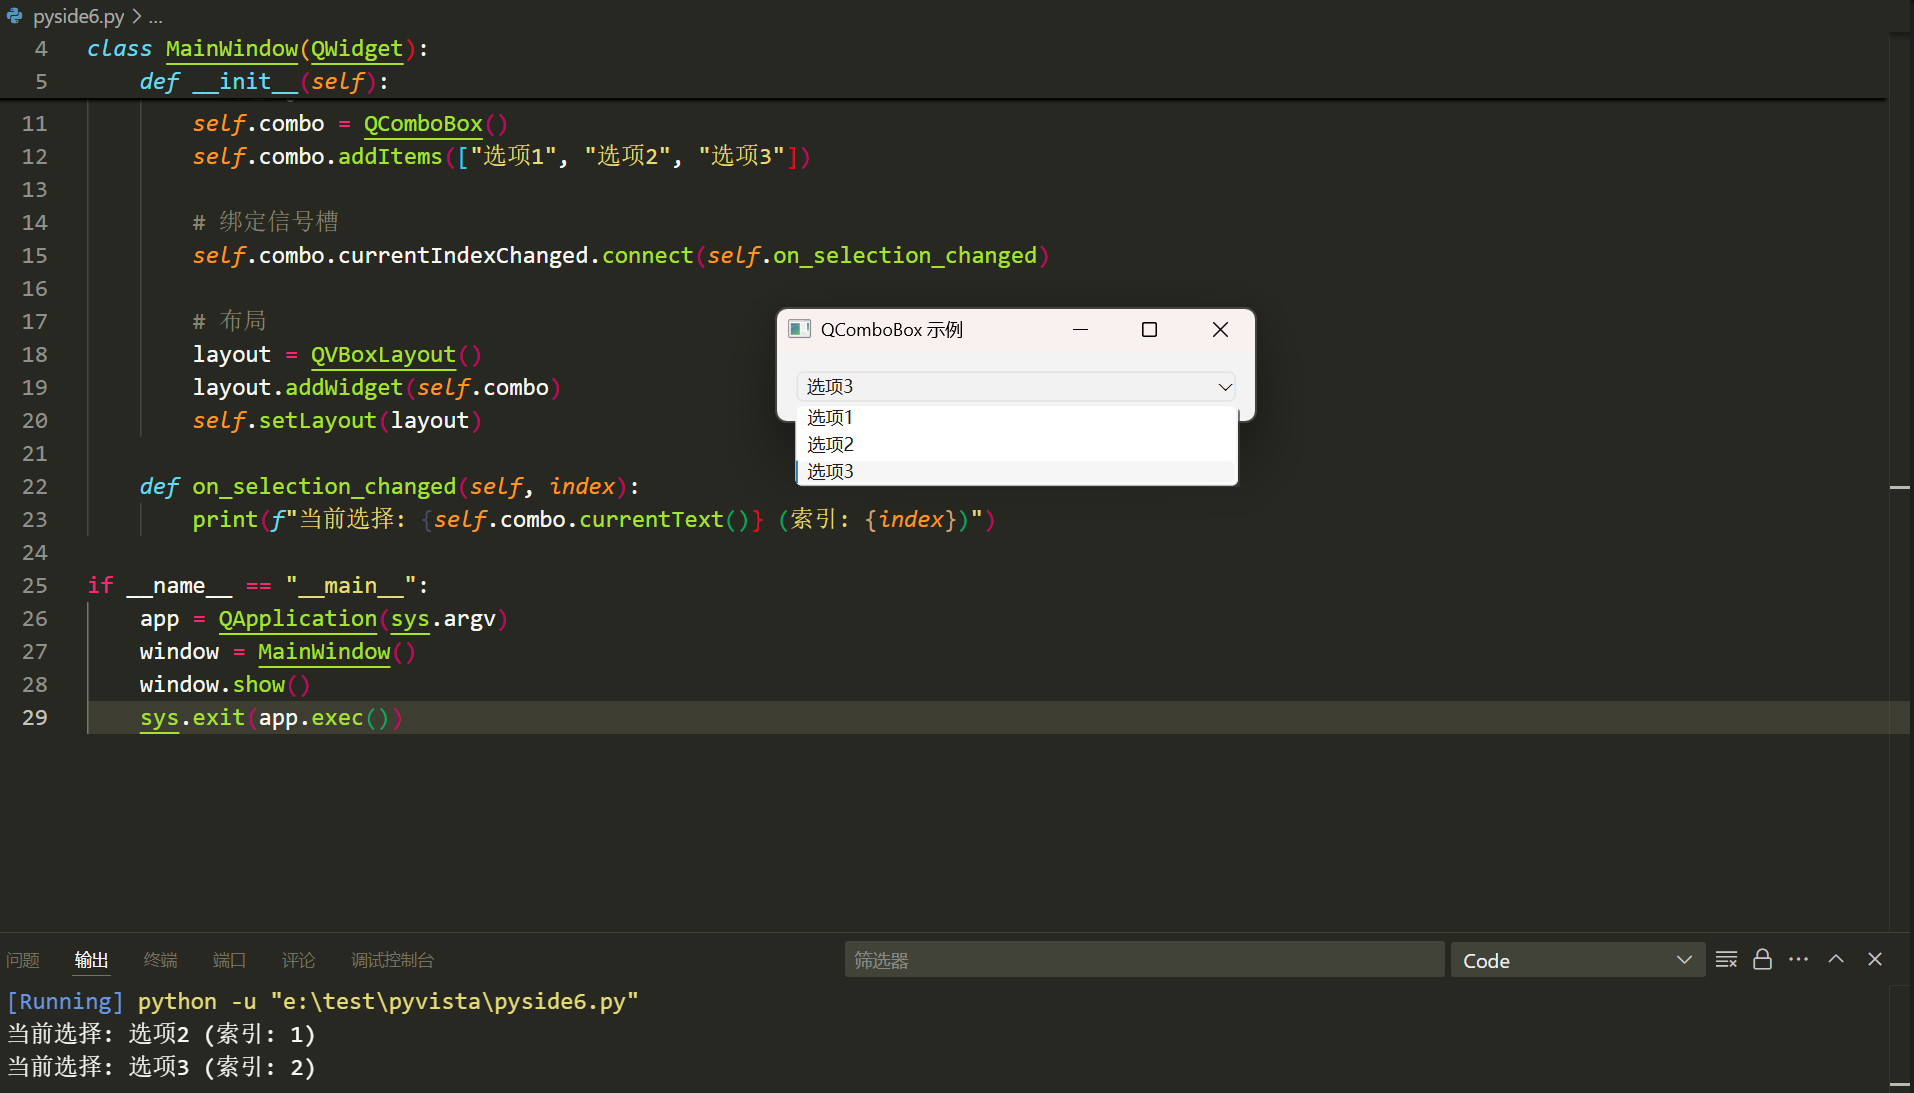
下拉框QComboBox
QComboBox 是 PySide6 提供的一个下拉框组件,允许用户从多个选项中进行选择,也可以支持用户输入自定义内容。
基础使用
from PySide6.QtWidgets import QApplication, QWidget, QVBoxLayout, QComboBox
import sys

class MainWindow(QWidget):
    def __init__(self):
        super().__init__()

        self.setWindowTitle("QComboBox 示例")

        # 创建 QComboBox
        self.combo = QComboBox()
        self.combo.addItems(["选项1", "选项2", "选项3"])

        # 绑定信号槽
        self.combo.currentIndexChanged.connect(self.on_selection_changed)

        # 布局
        layout = QVBoxLayout()
        layout.addWidget(self.combo)
        self.setLayout(layout)

    def on_selection_changed(self, index):
        print(f"当前选择: {self.combo.currentText()} (索引: {index})")

if __name__ == "__main__":
    app = QApplication(sys.argv)
    window = MainWindow()
    window.show()
    sys.exit(app.exec())
同样可以在qtdesigner中建立下拉框,这时有个疑问:在qtdesigner中建立的下拉框,如何在程序中找到呢?
比如在 对象检查器 中的下拉框名字为comboBox_background,在我们的signal.py这样引用:
class MainWindow(QMainWindow):
    def __init__(self):
        super(MainWindow, self).__init__()
        self.ui = Ui_MainWindow()
        self.ui.setupUi(self)
        self.ui.comboBox_background.addItems(["选项1", "选项2", "选项3"])
引用self.ui.comboBox_background即可。

现在再来分享下拉框的使用,一般情况下是在qtdesigner界面中添加下拉框控件,然后在signal.py中进行具体的设置,从上面的示例代码中演示了添加选项self.combo.addItems(["选项1", "选项2", "选项3"])、切换选项后触发的事件self.combo.currentIndexChanged.connect(self.on_selection_changed)。注意到此时信号发出时变为.currentIndexChanged,说明用户改变当前项的索引时发送信号。
常用方法
| 方法 | 说明 |
|---|---|
addItem(str) |
添加一个选项 |
addItems(List[str]) |
添加多个选项 |
removeItem(index) |
移除指定索引的选项 |
clear() |
清空所有选项 |
currentText() |
返回当前项的文字 |
currentIndex() |
返回当前项的序号,第一项的序号为 0 |
itemText(index) |
设返回索引号为 index 的项的文字 |
setMaxVisibleItems(count) |
设置下拉框最多显示的选项数量 |
count() |
返回项的个数 |
文本显示区域QTextBrowser
QTextBrowser是PySide6中用于显示富文本内容的控件,主要用途是展示带有格式的文本,并支持显示 HTML、RTF(富文本格式),在设计工业软件时,可以用它显示计算过程、日志显示区等。
案例一
比如我们可以通过设计html样式,用来显示日志显示区:
from PySide6.QtWidgets import QApplication, QWidget, QVBoxLayout, QTextBrowser, QPushButton
from PySide6.QtGui import QTextCursor

class MyWindow(QWidget):
    def __init__(self):
        super().__init__()
        self.setWindowTitle("Log Display Example")

        layout = QVBoxLayout()

        # 创建QTextBrowser用于日志显示
        self.text_browser = QTextBrowser()

        # 设置样式
        self.text_browser.setStyleSheet("""
            QTextBrowser {
                background-color: #f0f0f0;  /* 浅灰色背景 */
                color: #333333;  /* 深灰色文本 */
                font-family: Consolas, 'Courier New', monospace;
                font-size: 12pt;
                padding: 10px;
                border-radius: 5px;
            }
        """)

        # 启用外部链接
        self.text_browser.setOpenExternalLinks(True)

        # 创建按钮用于模拟日志输入
        log_button = QPushButton("Add Log")
        log_button.clicked.connect(self.add_log)

        layout.addWidget(self.text_browser)
        layout.addWidget(log_button)
        self.setLayout(layout)

    def add_log(self):
        """模拟添加日志条目"""
        # 这里可以添加不同级别的日志
        log_message = """
        <p style="color: #2e8b57;">[INFO] Application started successfully </p>
        <p style="color: #ffa500;">[WARNING] Potential issue detected </p>
        <p >纯文本 </p>
        <p style="color: #d9534f;">[ERROR] An error occurred while processing the data </p>
        """
        # 将新日志内容插入到QTextBrowser中
        self.text_browser.append(log_message)

        # 自动滚动到最后一行
        cursor = self.text_browser.textCursor()
        cursor.movePosition(QTextCursor.End)
        self.text_browser.setTextCursor(cursor)

if __name__ == "__main__":
    app = QApplication([])
    window = MyWindow()
    window.show()
    app.exec()
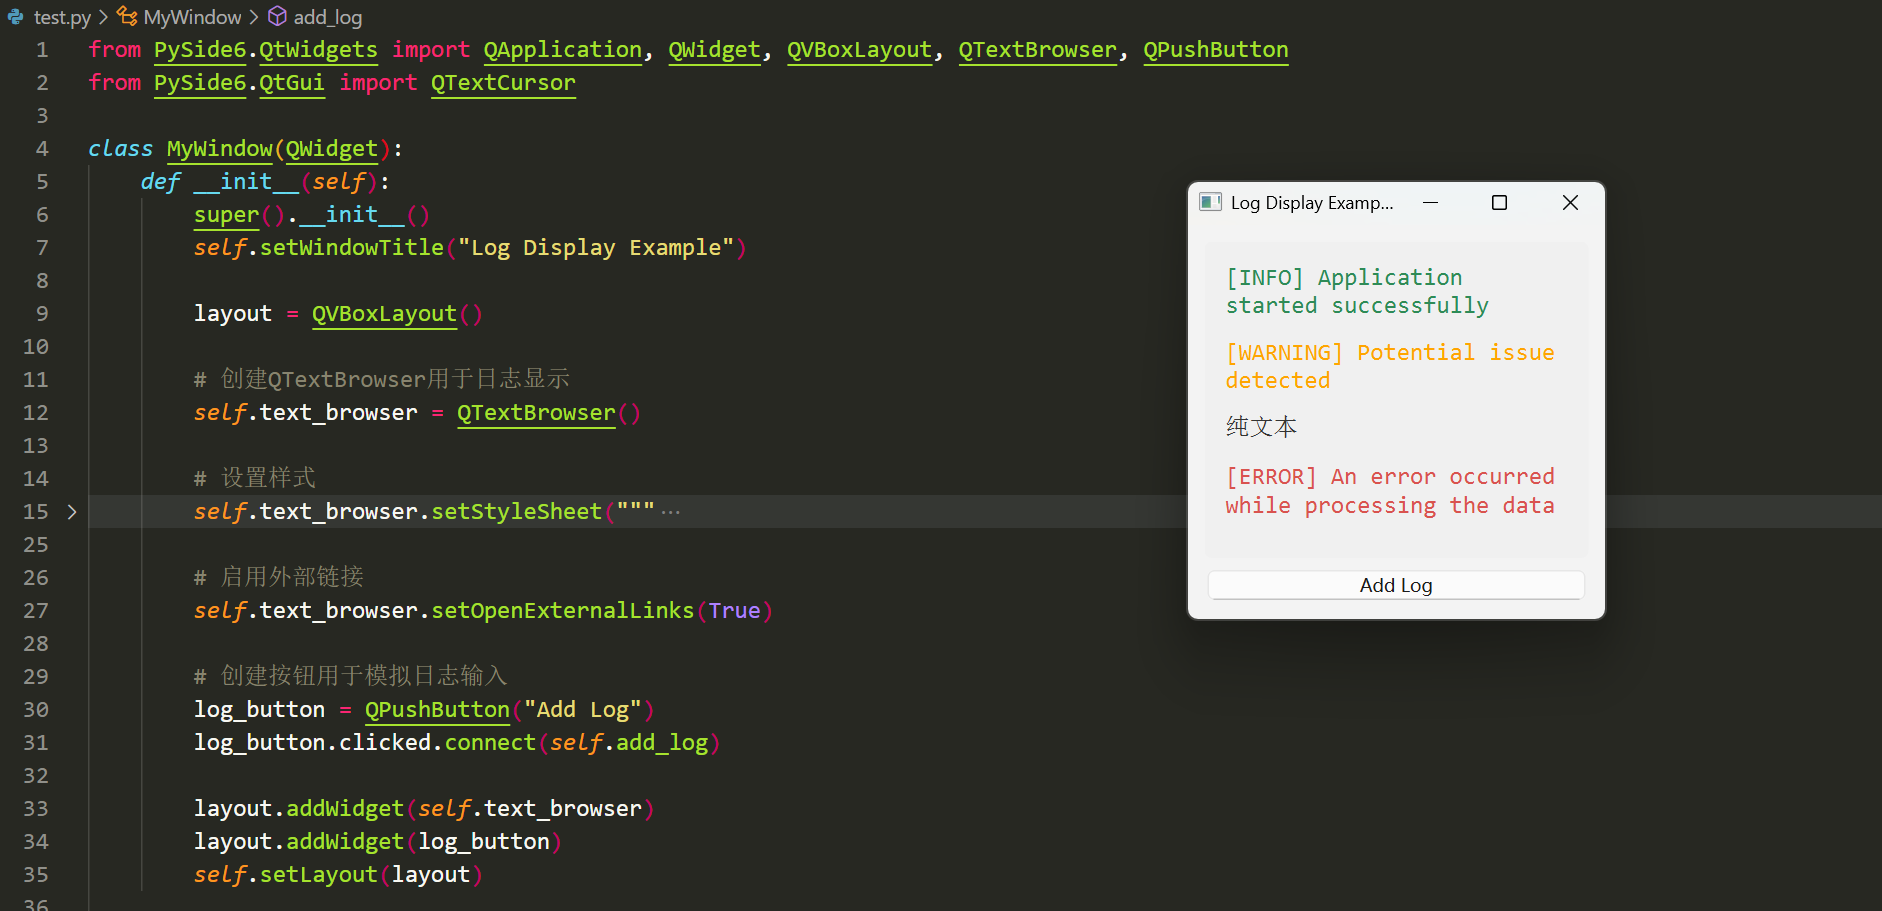
主要是.append,往区域内添加文本,如果想要清除区域内的文本,可以使用.clear()。
案例二
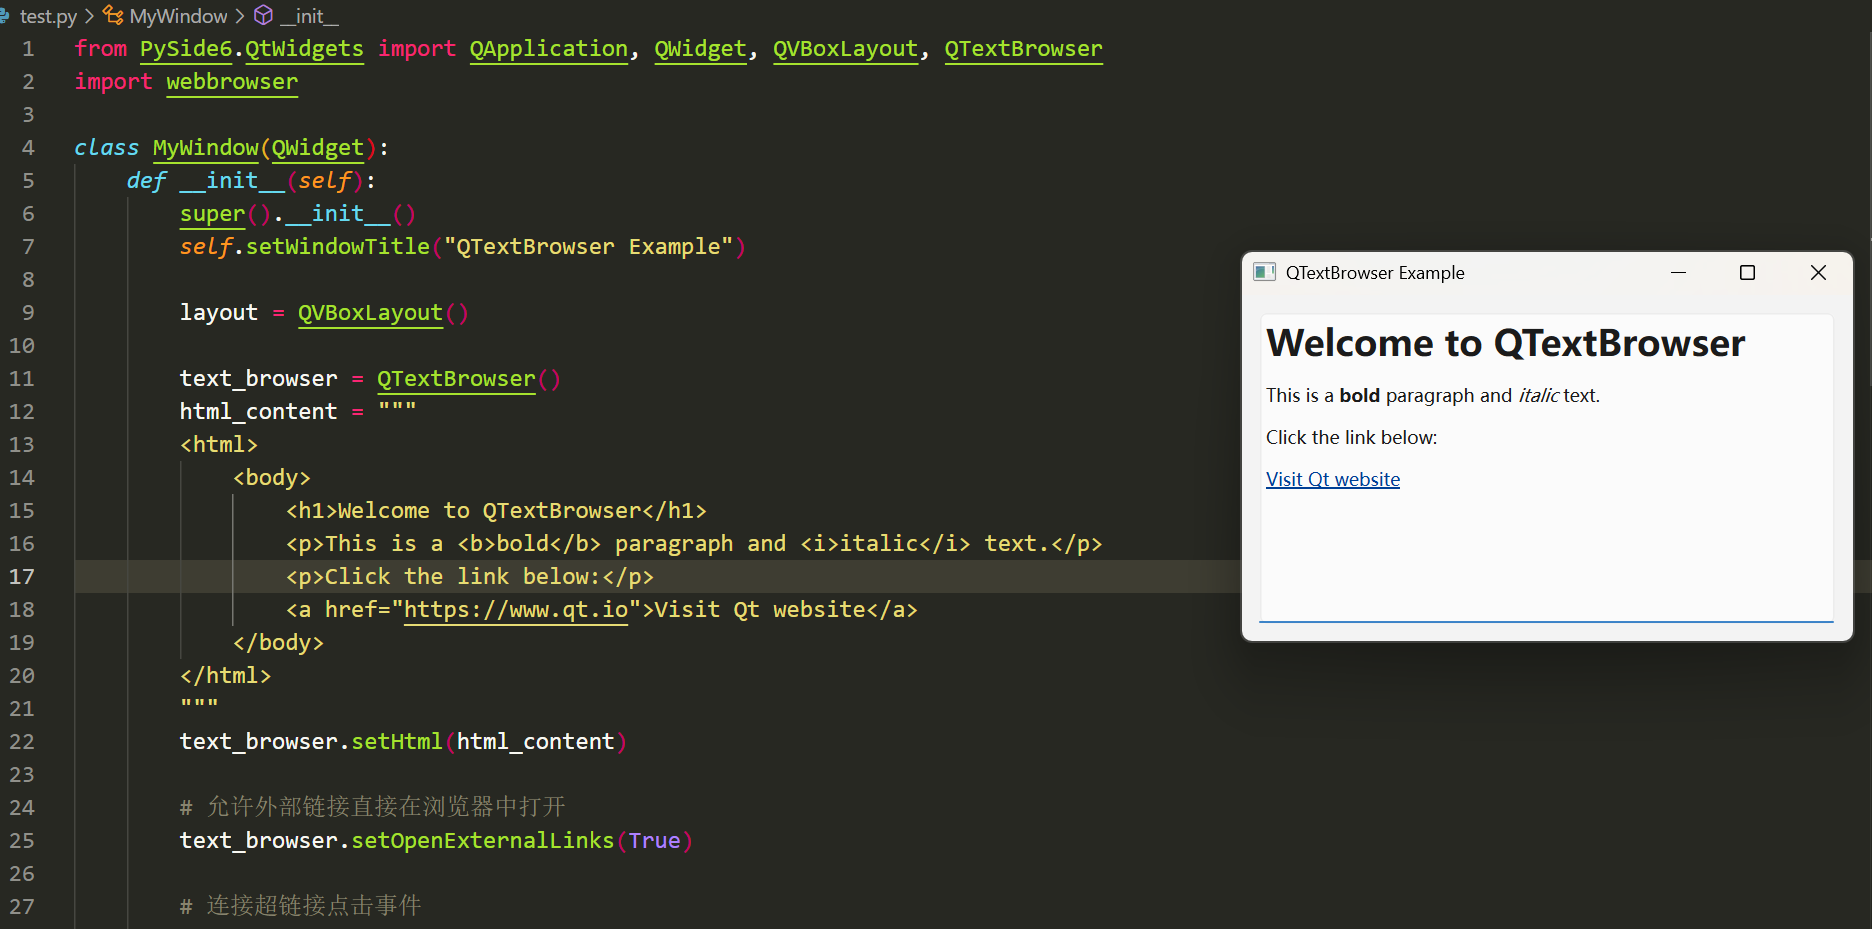
现在设计一个文本界面,用于自我介绍之类的,里面包括标题样式、字体样式、超链接等,如果熟悉html语法,完全可以做一个非常漂亮的页面。
from PySide6.QtWidgets import QApplication, QWidget, QVBoxLayout, QTextBrowser
import webbrowser

class MyWindow(QWidget):
    def __init__(self):
        super().__init__()
        self.setWindowTitle("QTextBrowser Example")

        layout = QVBoxLayout()

        text_browser = QTextBrowser()
        html_content = """
        <html>
            <body>
                <h1>Welcome to QTextBrowser</h1>
                <p>This is a <b>bold</b> paragraph and <i>italic</i> text.</p>
                <p>Click the link below:</p>
                <a href="https://yimumu.top">Visit Qt website</a>
            </body>
        </html>
        """
        text_browser.setHtml(html_content)

        # 允许外部链接直接在浏览器中打开
        text_browser.setOpenExternalLinks(True)

        # 连接超链接点击事件
        text_browser.anchorClicked.connect(self.on_anchor_clicked)

        layout.addWidget(text_browser)
        self.setLayout(layout)

    def on_anchor_clicked(self, url):
        """处理超链接点击事件并打开链接"""
        print(f"Clicked on link: {url}")
        webbrowser.open(url.toString())  # 使用 webbrowser 模块打开链接

if __name__ == "__main__":
    app = QApplication([])
    window = MyWindow()
    window.show()
    app.exec()
勾选框QCheckBox
QCheckBox是PySide6中用于创建复选框的控件。复选框允许用户选择或取消选择某个选项,通常用于表示二进制的状态(如选中或未选中)。
本次案例将与上节的QTextBrowser结合使用:
- 用户可以勾选或取消勾选多个复选框。
- 当复选框的状态发生变化时,QTextBrowser 会显示所有选中的功能及其详细描述。
- 如果没有选中任何复选框,QTextBrowser 会显示 “No features selected.”
案例
from PySide6.QtWidgets import QApplication, QWidget, QVBoxLayout, QCheckBox, QTextBrowser, QGroupBox, QFormLayout
from PySide6.QtCore import Qt

class MyWindow(QWidget):
    def __init__(self):
        super().__init__()

        self.setWindowTitle("QCheckBox and QTextBrowser Example")
        self.setGeometry(100, 100, 500, 400)

        layout = QVBoxLayout()

        # 创建QTextBrowser控件,用于显示选项的详细信息
        self.text_browser = QTextBrowser()
        self.text_browser.setStyleSheet("""
            QTextBrowser {
                background-color: #f5f5f5;
                font-size: 14px;
                color: #333;
                border: 1px solid #ccc;
                padding: 10px;
                border-radius: 5px;
            }
        """)
        layout.addWidget(self.text_browser)

        # 创建QGroupBox来组织复选框
        group_box = QGroupBox("Select Features")
        group_layout = QFormLayout()

        # 创建复选框
        self.checkbox1 = QCheckBox("Enable Feature A")
        self.checkbox2 = QCheckBox("Enable Feature B")
        self.checkbox3 = QCheckBox("Enable Feature C")

        # 将复选框添加到QFormLayout中
        group_layout.addRow(self.checkbox1)
        group_layout.addRow(self.checkbox2)
        group_layout.addRow(self.checkbox3)

        group_box.setLayout(group_layout)
        layout.addWidget(group_box)

        # 设置窗口的主布局
        self.setLayout(layout)

        # 连接复选框的状态变化信号到槽函数
        self.checkbox1.stateChanged.connect(self.update_browser)
        self.checkbox2.stateChanged.connect(self.update_browser)
        self.checkbox3.stateChanged.connect(self.update_browser)

        # 初始化 QTextBrowser 显示内容
        self.update_browser()

    def update_browser(self):
        """更新QTextBrowser的内容"""
        # 根据复选框的状态创建一个文本字符串
        content = "<h3>Selected Features:</h3><ul>"

        if self.checkbox1.isChecked():
            content += "<li><b>Feature A:</b> This is a description of Feature A.</li>"
        if self.checkbox2.isChecked():
            content += "<li><b>Feature B:</b> This is a description of Feature B.</li>"
        if self.checkbox3.isChecked():
            content += "<li><b>Feature C:</b> This is a description of Feature C.</li>"

        content += "</ul>"

        # 如果没有选择任何复选框,显示默认消息
        if not (self.checkbox1.isChecked() or self.checkbox2.isChecked() or self.checkbox3.isChecked()):
            content = "<h3>No features selected.</h3>"

        # 更新QTextBrowser的内容
        self.text_browser.setHtml(content)

if __name__ == "__main__":
    app = QApplication([])
    window = MyWindow()
    window.show()
    app.exec()

当复选框状态变化时,会发出.stateChanged信号,用于连接槽函数。.isChecked就是说选中的状态。
滑动条QSlider
QSlider是PySide6中用于创建滑块的控件。它允许用户通过拖动滑块来选择一个值。
- 最小值和最大值:通过设置setMinimum()和 etMaximum()来定义滑块的值范围
- 步长:通过setTickInterval()和setTickPosition()设置滑块的刻度和刻度位置
- 值变化信号:
valueChanged(int)信号会在滑块值变化时发出,可以用来触发相应的操作
常见方法
setValue(int):设置滑块的当前值。value():获取当前滑块的值。setOrientation(Qt.Orientation):设置滑块的方向,Qt.Horizontal或Qt.Vertical。setTickInterval(int):设置刻度之间的间隔。setTickPosition(QSlider.TickPosition):设置刻度的位置,可以选择刻度在滑块上方、下方或两侧。
案例
from PySide6.QtWidgets import QApplication, QWidget, QVBoxLayout, QLabel, QSlider
from PySide6.QtCore import Qt
class VolumeControl(QWidget):
def __init__(self):
super().__init__()
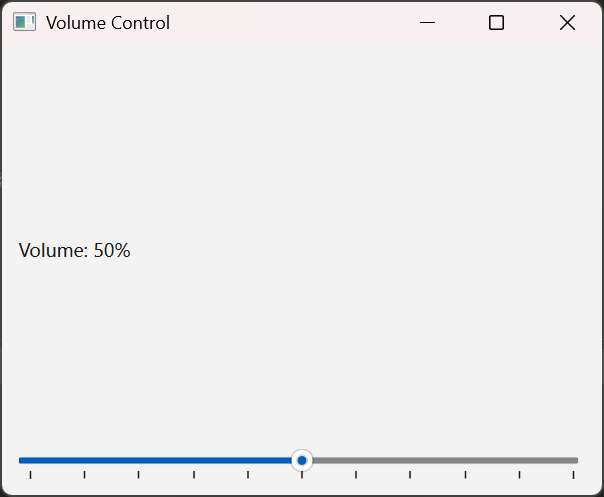
self.setWindowTitle("Volume Control")
self.setGeometry(100, 100, 400, 300)
layout = QVBoxLayout()
# 创建一个 QLabel 来显示音量大小
self.volume_label = QLabel("Volume: 50%")
layout.addWidget(self.volume_label)
# 创建 QSlider 控件(水平滑块)
self.volume_slider = QSlider(Qt.Horizontal)
self.volume_slider.setMinimum(0) # 最小值 0%
self.volume_slider.setMaximum(100) # 最大值 100%
self.volume_slider.setValue(50) # 初始值为 50%
self.volume_slider.setTickInterval(10) # 每 10% 为一个刻度
self.volume_slider.setTickPosition(QSlider.TicksBelow) # 刻度在滑块下方
layout.addWidget(self.volume_slider)
# 连接滑块的值变化信号到槽函数
self.volume_slider.valueChanged.connect(self.update_volume)
self.setLayout(layout)
def update_volume(self, value):
"""更新标签显示当前音量"""
self.volume_label.setText(f"Volume: {value}%")
if __name__ == "__main__":
app = QApplication([])
window = VolumeControl()
window.show()
app.exec()
单行文本QLineEdit
QLineEdit是PySide6中常用的单行文本输入控件,允许用户输入和编辑一行文本。它广泛应用于表单、搜索框、用户名/密码输入等场景。
- 文本设置与获取:setText() 和 text() 用于设置和获取文本。
- 占位符文本:通过 setPlaceholderText() 设置占位符文本,当输入框为空时显示提示。
- 输入限制:可以使用 setMaxLength() 限制输入的最大字符数。
- 输入类型:可以限制输入类型,如数字、邮箱、密码等。
- 回显模式:setEchoMode() 可以设置密码输入框,隐藏输入字符(例如,星号 *)以保护用户隐私。
- 信号:提供了多种信号,如 textChanged 和 editingFinished,可以在文本发生变化或编辑完成时执行操作。
案例
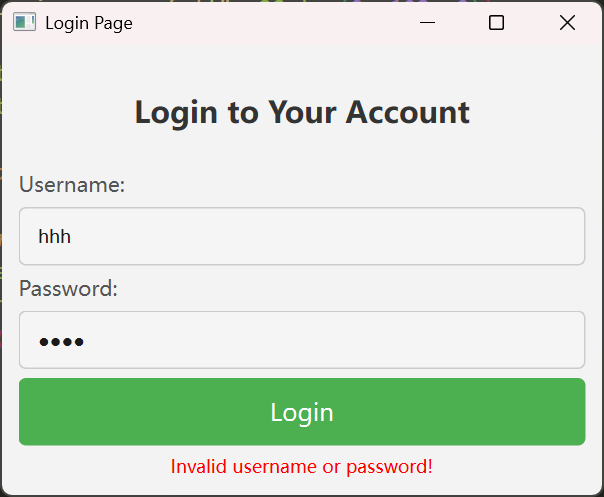
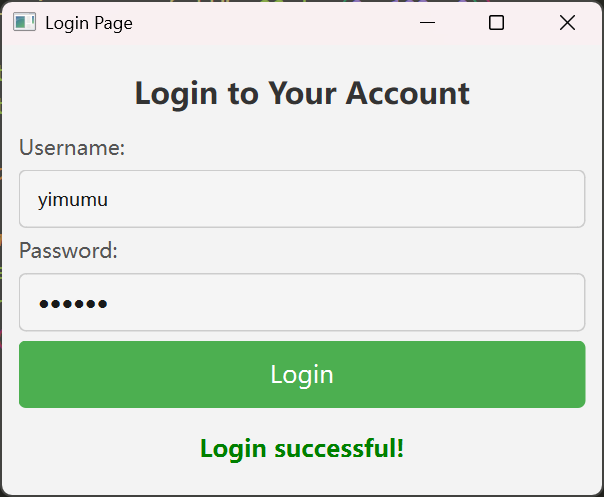
设计一个登录界面,正确的的用户名:yimumu,密码:123456。
from PySide6.QtWidgets import QApplication, QWidget, QVBoxLayout, QHBoxLayout, QLabel, QLineEdit, QPushButton
from PySide6.QtCore import Qt
from PySide6.QtGui import QColor

class LoginWindow(QWidget):
    def __init__(self):
        super().__init__()

        self.setWindowTitle("Login Page")
        self.setGeometry(400, 200, 400, 300)

        # 创建主布局
        main_layout = QVBoxLayout()

        # 创建标题标签
        title_label = QLabel("Login to Your Account")
        title_label.setAlignment(Qt.AlignCenter)
        title_label.setStyleSheet("font-size: 20px; font-weight: bold; color: #333;")
        main_layout.addWidget(title_label)

        # 创建用户名输入框
        self.username_label = QLabel("Username:")
        self.username_label.setStyleSheet("font-size: 14px; color: #555;")
        self.username_input = QLineEdit()
        self.username_input.setPlaceholderText("Enter your username")
        self.username_input.setStyleSheet("""
            QLineEdit {
                padding: 10px;
                border-radius: 5px;
                border: 1px solid #ccc;
                background-color: #f5f5f5;
            }
            QLineEdit:focus {
                border-color: #4CAF50;
                background-color: #fff;
            }
        """)

        # 创建密码输入框
        self.password_label = QLabel("Password:")
        self.password_label.setStyleSheet("font-size: 14px; color: #555;")
        self.password_input = QLineEdit()
        self.password_input.setEchoMode(QLineEdit.Password)
        self.password_input.setPlaceholderText("Enter your password")
        self.password_input.setStyleSheet("""
            QLineEdit {
                padding: 10px;
                border-radius: 5px;
                border: 1px solid #ccc;
                background-color: #f5f5f5;
            }
            QLineEdit:focus {
                border-color: #4CAF50;
                background-color: #fff;
            }
        """)

        # 创建登录按钮
        self.login_button = QPushButton("Login")
        self.login_button.setStyleSheet("""
            QPushButton {
                padding: 12px;
                font-size: 16px;
                color: white;
                background-color: #4CAF50;
                border: none;
                border-radius: 5px;
            }
            QPushButton:hover {
                background-color: #45a049;
            }
            QPushButton:pressed {
                background-color: #388e3c;
            }
        """)
        self.login_button.clicked.connect(self.handle_login)

        # 创建错误信息标签(隐藏)
        self.error_label = QLabel("")
        self.error_label.setStyleSheet("color: red; font-size: 12px;")
        self.error_label.setAlignment(Qt.AlignCenter)
        self.error_label.setVisible(False)

        # 创建布局
        form_layout = QVBoxLayout()
        form_layout.addWidget(self.username_label)
        form_layout.addWidget(self.username_input)
        form_layout.addWidget(self.password_label)
        form_layout.addWidget(self.password_input)
        form_layout.addWidget(self.login_button)
        form_layout.addWidget(self.error_label)

        # 将表单布局添加到主布局
        main_layout.addLayout(form_layout)

        self.setLayout(main_layout)

    def handle_login(self):
        """处理登录逻辑"""
        username = self.username_input.text()
        password = self.password_input.text()

        # 验证用户名和密码
        if username == "yimumu" and password == "123456":
            self.error_label.setVisible(False)
            self.show_message("Login successful!", QColor(0, 128, 0))
        else:
            self.error_label.setVisible(True)
            self.error_label.setText("Invalid username or password!")

    def show_message(self, message, color):
        """显示提示信息"""
        message_label = QLabel(message)
        message_label.setAlignment(Qt.AlignCenter)
        message_label.setStyleSheet(f"color: {color.name()}; font-size: 16px; font-weight: bold;")
        self.layout().addWidget(message_label)


if __name__ == "__main__":
    app = QApplication([])
    window = LoginWindow()
    window.show()
    app.exec()
数字输入控件QSpinBox
常用方法
setMinimum():设置最小值。setMaximum():设置最大值。setValue():设置当前值。value():获取当前值。setPrefix():为数值添加前缀。setSuffix():为数值添加后缀。setSingleStep():设置每次点击上下按钮时改变的步长。setRange():设置最小值和最大值的范围。
案例
from PySide6.QtWidgets import QApplication, QWidget, QVBoxLayout, QLabel, QSpinBox
from PySide6.QtCore import Qt

class AgeInputForm(QWidget):
    def __init__(self):
        super().__init__()

        self.setWindowTitle("Age Input Form")
        self.setGeometry(400, 200, 300, 200)

        # 创建主布局
        layout = QVBoxLayout()

        # 创建一个标签显示提示信息
        self.info_label = QLabel("Enter your age:")
        self.info_label.setAlignment(Qt.AlignCenter)
        layout.addWidget(self.info_label)

        # 创建一个 QSpinBox 控件用于设置年龄
        self.age_spinbox = QSpinBox()
        self.age_spinbox.setMinimum(0)  # 最小年龄为 0
        self.age_spinbox.setMaximum(100)  # 最大年龄为 100
        self.age_spinbox.setValue(25)  # 默认年龄为 25
        self.age_spinbox.setPrefix("Age: ")  # 设置前缀
        self.age_spinbox.setSuffix(" years")  # 设置后缀
        self.age_spinbox.setSingleStep(1)  # 设置步长为 1
        layout.addWidget(self.age_spinbox)

        # 创建一个标签来显示设置的年龄
        self.age_label = QLabel(f"Your age is: {self.age_spinbox.value()} years")
        self.age_label.setAlignment(Qt.AlignCenter)
        layout.addWidget(self.age_label)

        # 连接 QSpinBox 的值变化事件
        self.age_spinbox.valueChanged.connect(self.update_age_label)

        # 设置布局
        self.setLayout(layout)

    def update_age_label(self):
        """当 QSpinBox 的值变化时,更新 QLabel 显示的年龄"""
        age = self.age_spinbox.value()
        self.age_label.setText(f"Your age is: {age} years")


if __name__ == "__main__":
    app = QApplication([])
    window = AgeInputForm()
    window.show()
    app.exec()
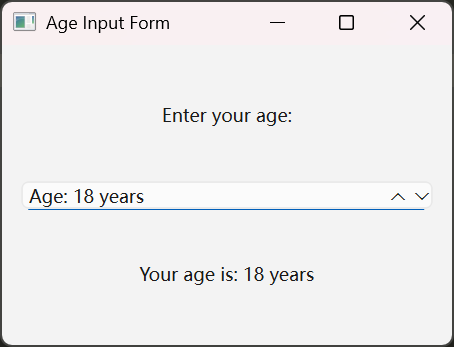
-
QSpinBox控件:允许用户设置年龄,最小值为 0,最大值为 100,默认值为 25。 使用 setPrefix 和 setSuffix 来分别在年龄前添加 “Age: “,并在年龄后添加 ” years”。
-
QLabel控件:显示当前输入的年龄,初始时显示为 “Your age is: 25 years”。 当 QSpinBox 的值发生变化时,标签内容也会实时更新,显示当前的年龄。
-
valueChanged信号:当 QSpinBox 的值变化时,触发 valueChanged 信号,连接到 update_age_label 方法来更新标签中的文本。
树结构
QTreeWidget是PySide6中用于显示树形结构数据的控件,它可以将信息组织成层次结构,通过节点和子节点的方式呈现。
主要特点
- 节点(Items): 每个节点是一个
QTreeWidgetItem对象,它代表树中的一个项目。每个节点可以包含多个列来显示不同的数据。 - 父子关系: 节点可以有子节点,也可以没有。每个节点可以通过
addChild()方法添加子节点,子节点会在父节点下显示。 - 多列支持:
QTreeWidget支持多列展示信息,每列可以通过QTreeWidgetItem的setText()方法来设置内容。 - 交互性: 支持节点的选择、展开、折叠等操作,并提供了事件处理方法(例如
itemClicked、itemExpanded等)来响应用户的操作。
常用方法
addTopLevelItem(item): 添加根节点。topLevelItem(index): 获取指定索引的根节点。itemFromIndex(index): 获取某个索引位置的节点。setItemExpanded(item, expanded): 设置节点是否展开。setColumnCount(count): 设置列数。setHeaderLabels(labels): 设置表头标签。
基础使用
from PySide6.QtWidgets import QApplication, QMainWindow, QTreeWidget, QTreeWidgetItem

class TreeWidgetExample(QMainWindow):
    def __init__(self):
        super().__init__()
        self.tree = QTreeWidget(self)
        self.tree.setColumnCount(2)
        self.tree.setHeaderLabels(["Name", "Description"])

        # 创建根节点
        root_item = QTreeWidgetItem(["Root", "This is the root"])
        self.tree.addTopLevelItem(root_item)

        # 添加子节点
        child_item1 = QTreeWidgetItem(["Child 1", "This is child 1"])
        root_item.addChild(child_item1)

        child_item2 = QTreeWidgetItem(["Child 2", "This is child 2"])
        root_item.addChild(child_item2)

        self.tree.expandAll()  # 展开所有节点
        self.setCentralWidget(self.tree)

if __name__ == "__main__":
    app = QApplication([])
    window = TreeWidgetExample()
    window.show()
    app.exec()
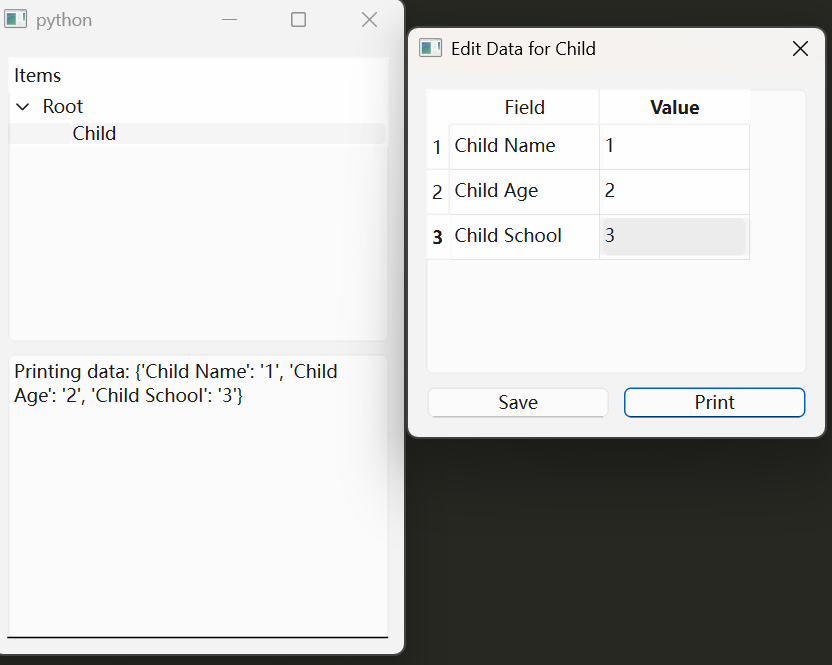
与表格控件联用
from PySide6.QtWidgets import QApplication, QMainWindow, QTreeWidget, QTreeWidgetItem, QDialog, QTableWidget, QTableWidgetItem, QVBoxLayout, QPushButton, QHBoxLayout, QTextEdit, QWidget

class TableDialog(QDialog):
    def __init__(self, parent, node_name):
        super().__init__(parent)
        self.setWindowTitle(f"Edit Data for {node_name}")
        self.parent = parent  # 获取父窗口,方便打印

        # 初始化表格控件
        self.table = QTableWidget(self)
        self.table.setRowCount(3)
        self.table.setColumnCount(2)
        self.table.setHorizontalHeaderLabels(["Field", "Value"])

        # 根据节点名称设置表格内容
        if node_name == "Root":
            self.table.setItem(0, 0, QTableWidgetItem("Root Name"))
            self.table.setItem(1, 0, QTableWidgetItem("Root Age"))
            self.table.setItem(2, 0, QTableWidgetItem("Root City"))
        elif node_name == "Child":
            self.table.setItem(0, 0, QTableWidgetItem("Child Name"))
            self.table.setItem(1, 0, QTableWidgetItem("Child Age"))
            self.table.setItem(2, 0, QTableWidgetItem("Child School"))

        # 保存和打印按钮
        self.save_button = QPushButton("Save", self)
        self.print_button = QPushButton("Print", self)

        # 布局
        layout = QVBoxLayout()
        layout.addWidget(self.table)

        button_layout = QHBoxLayout()
        button_layout.addWidget(self.save_button)
        button_layout.addWidget(self.print_button)

        layout.addLayout(button_layout)

        self.setLayout(layout)

        # 连接信号和槽
        self.save_button.clicked.connect(self.save_data)
        self.print_button.clicked.connect(self.print_data)

    def save_data(self):
        # 保存数据的逻辑
        data = {}
        for row in range(self.table.rowCount()):
            field_item = self.table.item(row, 0)
            value_item = self.table.item(row, 1)
            if field_item and value_item:
                data[field_item.text()] = value_item.text()
        self.parent.print_to_log(f"Data saved: {data}")

    def print_data(self):
        # 打印数据的逻辑
        data = {}
        for row in range(self.table.rowCount()):
            field_item = self.table.item(row, 0)
            value_item = self.table.item(row, 1)
            if field_item and value_item:
                data[field_item.text()] = value_item.text()
        self.parent.print_to_log(f"Printing data: {data}")

class TreeWidgetExample(QMainWindow):
    def __init__(self):
        super().__init__()

        # 初始化树形控件
        self.tree = QTreeWidget(self)
        self.tree.setColumnCount(1)
        self.tree.setHeaderLabels(["Items"])

        # 添加根节点
        root_item = QTreeWidgetItem(["Root"])
        self.tree.addTopLevelItem(root_item)

        # 添加子节点
        child_item = QTreeWidgetItem(["Child"])
        root_item.addChild(child_item)

        # 创建日志显示区域
        self.log_display = QTextEdit(self)
        self.log_display.setReadOnly(True)

        # 设置布局
        layout = QVBoxLayout()
        layout.addWidget(self.tree)
        layout.addWidget(self.log_display)

        container = QWidget()
        container.setLayout(layout)
        self.setCentralWidget(container)

        # 连接信号和槽
        self.tree.itemDoubleClicked.connect(self.on_item_double_clicked)

    def on_item_double_clicked(self, item, column):
        # 双击节点时,根据节点内容弹出不同的表格
        node_name = item.text(0)
        dialog = TableDialog(self, node_name)
        dialog.exec()

    def print_to_log(self, text):
        # 将打印内容显示在日志区域
        self.log_display.append(text)

if __name__ == "__main__":
    app = QApplication([])
    window = TreeWidgetExample()
    window.show()
    app.exec()
代码解释:
TableDialog类:继承自QDialog(下一节详细讲述),表示这是一个对话框窗口。其中包含一个表格控件(QTableWidget)和两个按钮(“保存”和“打印”)。这个对话框根据不同的树节点数据(比如“Root”或“Child”节点)显示不同的字段,允许用户编辑这些字段的值。- 在
__init__方法中,通过parent参数保存主窗口(TreeWidgetExample类的实例),这样在表格操作时可以将数据打印到主窗口的日志区域。
- 在
QTableWidget是一个表格控件,用于显示和编辑表格数据,本例表格有3行2列,第一列显示字段名,第二列显示字段值。- 根据传入的
node_name(节点名称),表格添加不同的字段。例如,如果是Root节点,表格将显示"Root Name","Root Age","Root City"等字段。if node_name == "Root": self.table.setItem(0, 0, QTableWidgetItem("Root Name")) self.table.setItem(1, 0, QTableWidgetItem("Root Age")) self.table.setItem(2, 0, QTableWidgetItem("Root City")) elif node_name == "Child": self.table.setItem(0, 0, QTableWidgetItem("Child Name")) self.table.setItem(1, 0, QTableWidgetItem("Child Age")) self.table.setItem(2, 0, QTableWidgetItem("Child School")) TreeWidgetExample类,self.tree.itemDoubleClicked.connect(self.on_item_double_clicked)将树节点的双击事件连接到on_item_double_clicked方法,这样用户双击节点时会弹出相应的表格对话框。
对话框QDialog
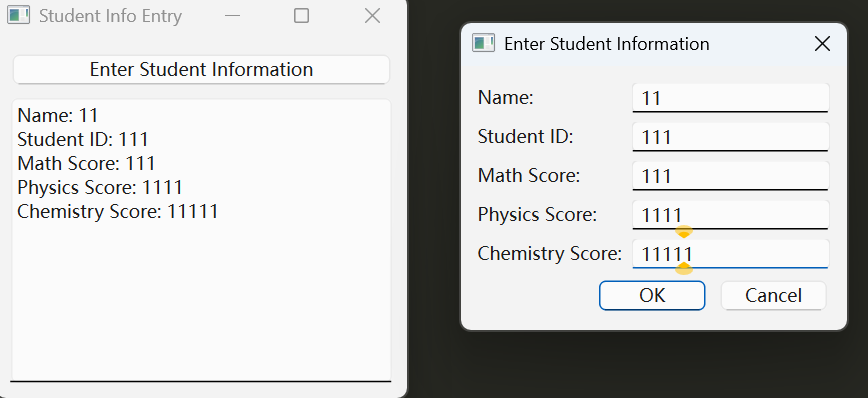
自定义对话框
from PySide6.QtWidgets import QApplication, QMainWindow, QDialog, QVBoxLayout, QWidget, QFormLayout, QLabel, QLineEdit, QPushButton, QDialogButtonBox, QTextEdit
from PySide6.QtCore import Qt

class InputDialog(QDialog):
    def __init__(self):
        super().__init__()

        self.setWindowTitle("Enter Student Information")

        # 创建布局
        layout = QVBoxLayout()

        # 创建表单布局
        form_layout = QFormLayout()

        # 姓名
        self.name_input = QLineEdit()
        form_layout.addRow(QLabel("Name:"), self.name_input)

        # 学号
        self.id_input = QLineEdit()
        form_layout.addRow(QLabel("Student ID:"), self.id_input)

        # 各科成绩
        self.math_score_input = QLineEdit()
        form_layout.addRow(QLabel("Math Score:"), self.math_score_input)

        self.physics_score_input = QLineEdit()
        form_layout.addRow(QLabel("Physics Score:"), self.physics_score_input)

        self.chemistry_score_input = QLineEdit()
        form_layout.addRow(QLabel("Chemistry Score:"), self.chemistry_score_input)

        layout.addLayout(form_layout)

        # 创建按钮
        button_box = QDialogButtonBox(QDialogButtonBox.Ok | QDialogButtonBox.Cancel)
        button_box.accepted.connect(self.accept)  # 点击“确定”时接受输入
        button_box.rejected.connect(self.reject)  # 点击“取消”时拒绝输入

        layout.addWidget(button_box)

        self.setLayout(layout)

    def get_data(self):
        # 返回用户输入的数据
        return {
            "name": self.name_input.text(),
            "id": self.id_input.text(),
            "math_score": self.math_score_input.text(),
            "physics_score": self.physics_score_input.text(),
            "chemistry_score": self.chemistry_score_input.text()
        }

class MainWindow(QMainWindow):
    def __init__(self):
        super().__init__()

        self.setWindowTitle("Student Info Entry")

        # 创建按钮
        self.open_dialog_button = QPushButton("Enter Student Information")
        self.open_dialog_button.clicked.connect(self.open_dialog)

        # 创建显示数据的 QTextEdit
        self.output_area = QTextEdit(self)
        self.output_area.setReadOnly(True)

        # 布局设置
        layout = QVBoxLayout()
        layout.addWidget(self.open_dialog_button)
        layout.addWidget(self.output_area)

        container = QWidget()
        container.setLayout(layout)
        self.setCentralWidget(container)

    def open_dialog(self):
        # 创建并显示输入对话框
        dialog = InputDialog()
        if dialog.exec() == QDialog.Accepted:
            # 获取数据并显示到界面上
            student_data = dialog.get_data()
            self.display_data(student_data)

    def display_data(self, student_data):
        # 将获取的数据显示到 QTextEdit 上
        display_text = f"Name: {student_data['name']}\n"
        display_text += f"Student ID: {student_data['id']}\n"
        display_text += f"Math Score: {student_data['math_score']}\n"
        display_text += f"Physics Score: {student_data['physics_score']}\n"
        display_text += f"Chemistry Score: {student_data['chemistry_score']}\n"

        self.output_area.setPlainText(display_text)

if __name__ == "__main__":
    app = QApplication([])
    window = MainWindow()
    window.show()
    app.exec()
代码解释:
InputDialog类:自定义输入对话框QDialog类的子类,用于创建一个自定义的对话框,包含多个输入控件QFormLayout:使用表单布局来排列标签和输入框- 包含如下输入框:
- 姓名(
QLineEdit) - 学号(
QLineEdit) - 数学成绩(
QLineEdit) - 物理成绩(
QLineEdit) - 化学成绩(
QLineEdit)
- 姓名(
QDialogButtonBox:包含两个按钮:“确定”和“取消”。“确定”按钮会调用accept()方法,关闭对话框并返回数据;“取消”按钮会调用reject()方法,关闭对话框。
- 在MainWindow中,添加了一个
QTextEdit控件,名为output_area,用于显示用户输入的数据。设置setReadOnly(True)使其不可编辑 - 通过
self.output_area.setPlainText(display_text)来显示数据。 - 通过
dialog.get_data()获取用户输入的数据
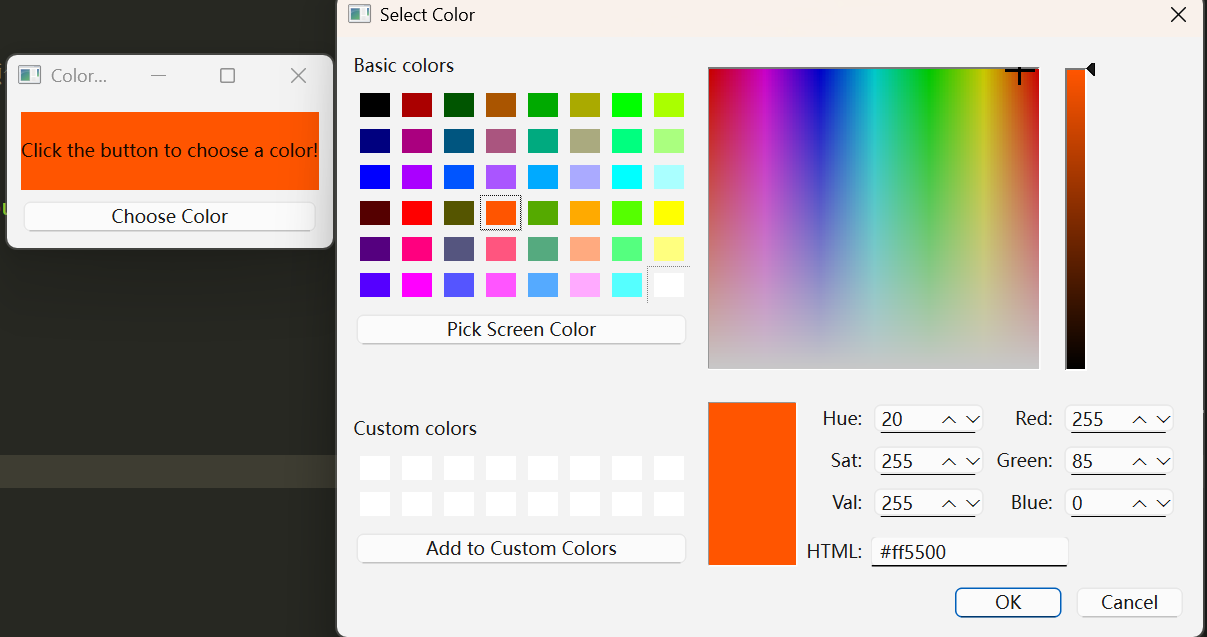
颜色对话框QColorDialog
QColorDialog是一个用于选择颜色的对话框,允许用户选择颜色并返回选择的颜色对象。
通过调用QColorDialog.getColor()方法,打开颜色选择对话框。该方法返回一个QColor对象,如果用户点击“OK”按钮选择了颜色,getColor()会返回一个有效的QColor对象;如果用户取消选择,返回无效的颜色(QColor())。
from PySide6.QtWidgets import QApplication, QMainWindow, QVBoxLayout, QPushButton, QLabel, QColorDialog, QWidget
from PySide6.QtCore import Qt

class MainWindow(QMainWindow):
    def __init__(self):
        super().__init__()

        self.setWindowTitle("Color Dialog Example")

        # 创建一个 QLabel 显示文本
        self.label = QLabel("Click the button to choose a color!", self)
        self.label.setAlignment(Qt.AlignCenter)
        self.label.setAutoFillBackground(True)  # 启用自动填充背景颜色

        # 创建按钮,点击按钮弹出颜色选择对话框
        self.color_button = QPushButton("Choose Color", self)
        self.color_button.clicked.connect(self.open_color_dialog)

        # 设置布局
        layout = QVBoxLayout()
        layout.addWidget(self.label)
        layout.addWidget(self.color_button)

        container = QWidget()
        container.setLayout(layout)
        self.setCentralWidget(container)

    def open_color_dialog(self):
        # 打开颜色选择对话框
        color = QColorDialog.getColor()

        # 如果选择了有效的颜色,改变 QLabel 背景颜色
        if color.isValid():
            # 设置 QLabel 背景颜色
            palette = self.label.palette()
            palette.setColor(self.label.backgroundRole(), color)
            self.label.setPalette(palette)

if __name__ == "__main__":
    app = QApplication([])
    window = MainWindow()
    window.show()
    app.exec()
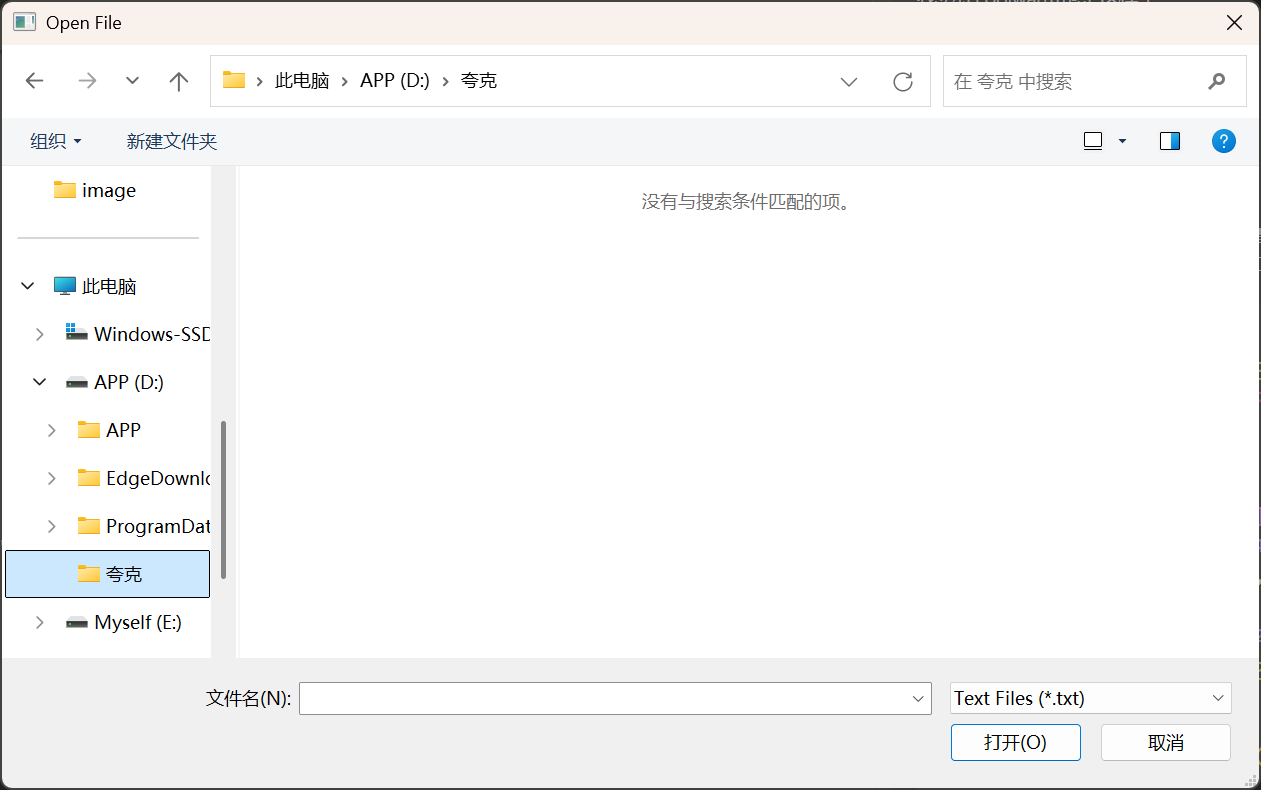
文件对话框QFileDialog
QFileDialog是一个用于文件和目录选择的对话框,允许用户在文件系统中选择文件或目录,用于实现 打开文件、保存文件、选择目录 等功能。
常见方法:
QFileDialog.getOpenFileName():打开文件对话框,选择单个文件。QFileDialog.getOpenFileNames():打开文件对话框,选择多个文件。QFileDialog.getSaveFileName():打开保存文件对话框,选择保存文件路径。QFileDialog.getExistingDirectory():打开选择目录对话框。
from PySide6.QtWidgets import QApplication, QMainWindow, QVBoxLayout, QPushButton, QLabel, QFileDialog, QWidget
from PySide6.QtCore import Qt

class MainWindow(QMainWindow):
    def __init__(self):
        super().__init__()

        self.setWindowTitle("Open File Dialog Example")

        # 创建一个 QLabel 显示文本
        self.label = QLabel("Click the button to open a file", self)
        self.label.setAlignment(Qt.AlignCenter)

        # 创建打开文件按钮,点击后打开文件选择对话框
        self.open_button = QPushButton("Open File", self)
        self.open_button.clicked.connect(self.open_file)

        # 设置布局
        layout = QVBoxLayout()
        layout.addWidget(self.label)
        layout.addWidget(self.open_button)

        container = QWidget()
        container.setLayout(layout)
        self.setCentralWidget(container)

    def open_file(self):
        # 打开文件选择对话框
        file_path, _ = QFileDialog.getOpenFileName(self, "Open File", "", "Text Files (*.txt);;All Files (*)")

        if file_path:
            # 显示选择的文件路径
            self.label.setText(f"Opened file: {file_path}")

if __name__ == "__main__":
    app = QApplication([])
    window = MainWindow()
    window.show()
    app.exec()
代码解释:
QFileDialog.getOpenFileName():该方法用于打开一个文件选择对话框,用户可以选择单个文件。getOpenFileName()返回两个值:选择的文件路径和过滤器选择(一个字符串,表示用户选中的文件类型)。如果用户取消选择,返回空字符串。QFileDialog.getSaveFileName():该方法用于打开保存文件对话框,允许用户选择文件保存的位置和名称。- 文件类型过滤器:如
"Text Files (*.txt);;All Files (*)"。这表示用户可以选择 .txt 文件或者任意文件。;;是用来分隔不同文件类型过滤器的。
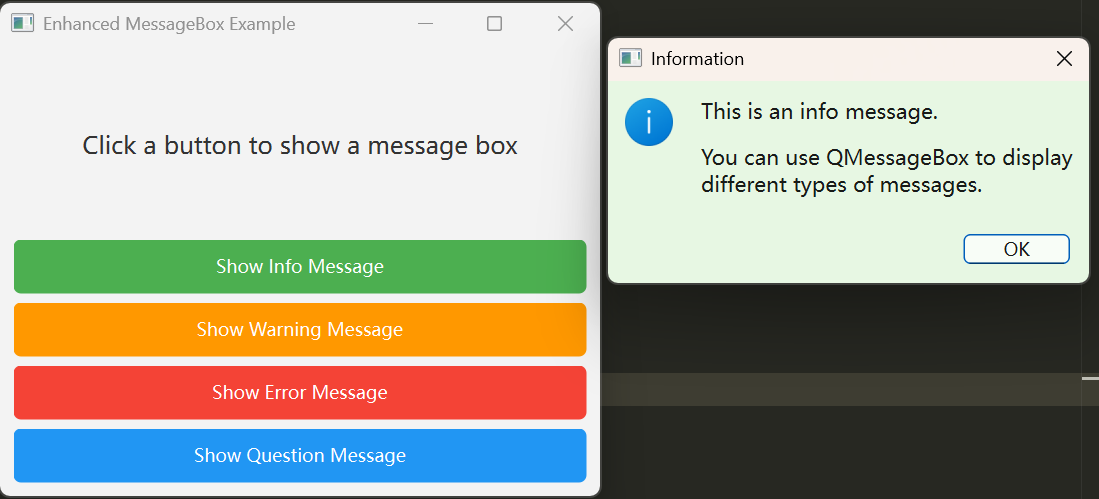
信息对话框QMessageBox
QMessageBox是一个用于显示消息框的类,可以用来向用户展示信息、警告、错误或询问用户确认。
常用功能:
- 信息消息框:显示普通的信息。
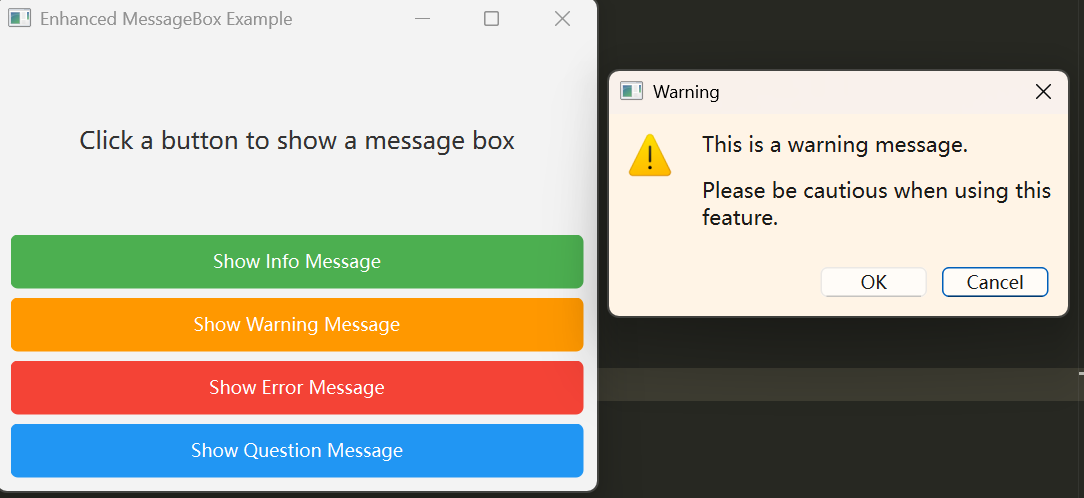
- 警告消息框:显示警告信息。
- 错误消息框:显示错误信息。
- 询问消息框:询问用户是否确认某个操作(例如,“是否保存”)。
- 自定义消息框:你可以自定义消息框的按钮、图标等内容。
常用方法:
QMessageBox.information():用于显示信息类型的消息框。QMessageBox.warning():用于显示警告类型的消息框。QMessageBox.critical():用于显示错误类型的消息框。QMessageBox.question():用于显示询问类型的消息框。QMessageBox.exec():用于显示消息框并等待用户的响应。
from PySide6.QtWidgets import QApplication, QMainWindow, QVBoxLayout, QPushButton, QLabel, QMessageBox, QWidget
from PySide6.QtGui import QIcon
from PySide6.QtCore import Qt
class MainWindow(QMainWindow):
def __init__(self):
super().__init__()
self.setWindowTitle("Enhanced MessageBox Example")
self.setGeometry(100, 100, 400, 300)
# 创建一个 QLabel 显示文本
self.label = QLabel("Click a button to show a message box", self)
self.label.setAlignment(Qt.AlignCenter)
self.label.setStyleSheet("font-size: 16px; color: #333;")
# 创建按钮,点击按钮弹出不同类型的消息框
self.info_button = QPushButton("Show Info Message", self)
self.info_button.setStyleSheet("background-color: #4CAF50; color: white; padding: 10px; border-radius: 5px;")
self.info_button.clicked.connect(self.show_info_message)
self.warning_button = QPushButton("Show Warning Message", self)
self.warning_button.setStyleSheet("background-color: #FF9800; color: white; padding: 10px; border-radius: 5px;")
self.warning_button.clicked.connect(self.show_warning_message)
self.error_button = QPushButton("Show Error Message", self)
self.error_button.setStyleSheet("background-color: #F44336; color: white; padding: 10px; border-radius: 5px;")
self.error_button.clicked.connect(self.show_error_message)
self.question_button = QPushButton("Show Question Message", self)
self.question_button.setStyleSheet("background-color: #2196F3; color: white; padding: 10px; border-radius: 5px;")
self.question_button.clicked.connect(self.show_question_message)
# 设置布局
layout = QVBoxLayout()
layout.addWidget(self.label)
layout.addWidget(self.info_button)
layout.addWidget(self.warning_button)
layout.addWidget(self.error_button)
layout.addWidget(self.question_button)
container = QWidget()
container.setLayout(layout)
self.setCentralWidget(container)
def show_info_message(self):
# 显示信息类型的消息框
msg = QMessageBox(self)
msg.setIcon(QMessageBox.Information)
msg.setWindowTitle("Information")
msg.setText("This is an info message.")
msg.setInformativeText("You can use QMessageBox to display different types of messages.")
msg.setStandardButtons(QMessageBox.Ok)
msg.setStyleSheet("QMessageBox { background-color: #e7f7e3; font-size: 14px; }")
msg.exec()
def show_warning_message(self):
# 显示警告类型的消息框
msg = QMessageBox(self)
msg.setIcon(QMessageBox.Warning)
msg.setWindowTitle("Warning")
msg.setText("This is a warning message.")
msg.setInformativeText("Please be cautious when using this feature.")
msg.setStandardButtons(QMessageBox.Ok | QMessageBox.Cancel)
msg.setDefaultButton(QMessageBox.Cancel)
msg.setStyleSheet("QMessageBox { background-color: #fff4e6; font-size: 14px; }")
msg.exec()
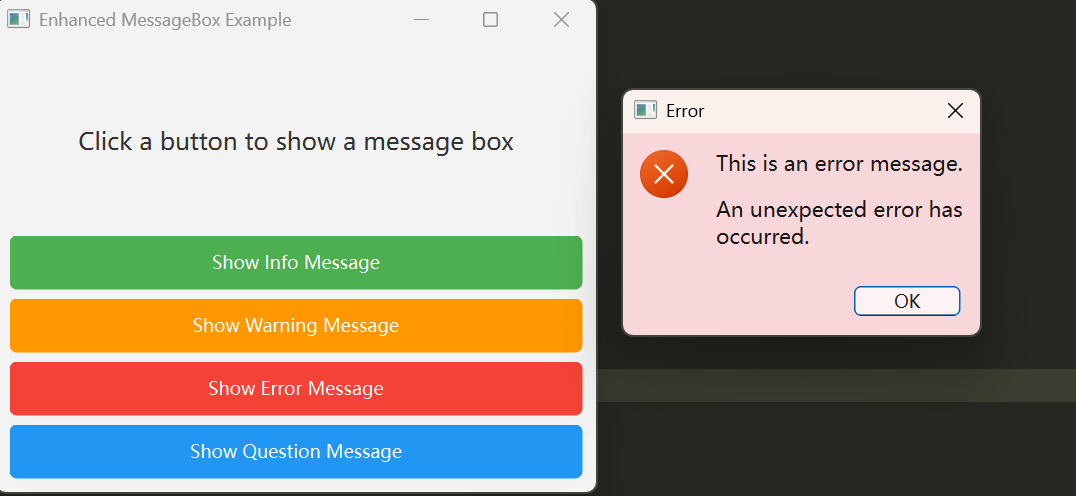
def show_error_message(self):
# 显示错误类型的消息框
msg = QMessageBox(self)
msg.setIcon(QMessageBox.Critical)
msg.setWindowTitle("Error")
msg.setText("This is an error message.")
msg.setInformativeText("An unexpected error has occurred.")
msg.setStandardButtons(QMessageBox.Ok)
msg.setStyleSheet("QMessageBox { background-color: #f8d7da; font-size: 14px; }")
msg.exec()
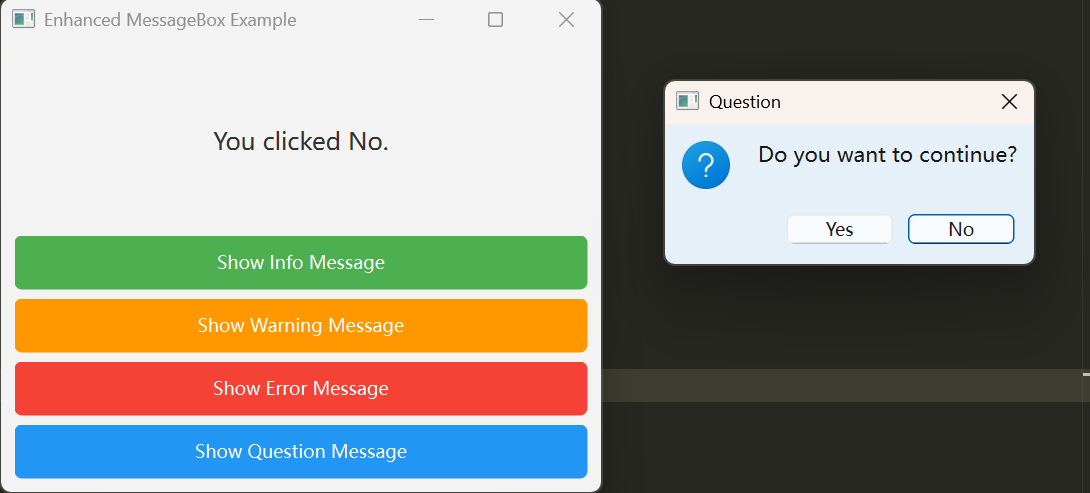
def show_question_message(self):
# 显示询问类型的消息框
msg = QMessageBox(self)
msg.setIcon(QMessageBox.Question)
msg.setWindowTitle("Question")
msg.setText("Do you want to continue?")
msg.setStandardButtons(QMessageBox.Yes | QMessageBox.No)
msg.setDefaultButton(QMessageBox.No)
msg.setStyleSheet("QMessageBox { background-color: #e6f0f9; font-size: 14px; }")
reply = msg.exec()
if reply == QMessageBox.Yes:
self.label.setText("You clicked Yes.")
else:
self.label.setText("You clicked No.")
if __name__ == "__main__":
app = QApplication([])
window = MainWindow()
window.show()
app.exec()
代码解释:
QMessageBox.information():用于显示信息类型的消息框。- 第一个参数是父窗口(self),第二个参数是消息框的标题,第三个参数是消息框的文本内容。
QMessageBox.warning():用于显示警告类型的消息框,功能和information() 类似,只是图标和样式不同。QMessageBox.critical():用于显示错误类型的消息框,通常用于显示重大错误信息,带有错误图标。QMessageBox.question():用于显示一个询问类型的消息框,它可以包含“是”和“否”按钮。- QMessageBox.Yes | QMessageBox.No:表示“是”和“否”按钮。
- QMessageBox.No:默认选中的按钮。
exec():用于启动消息框并阻塞,直到用户响应。
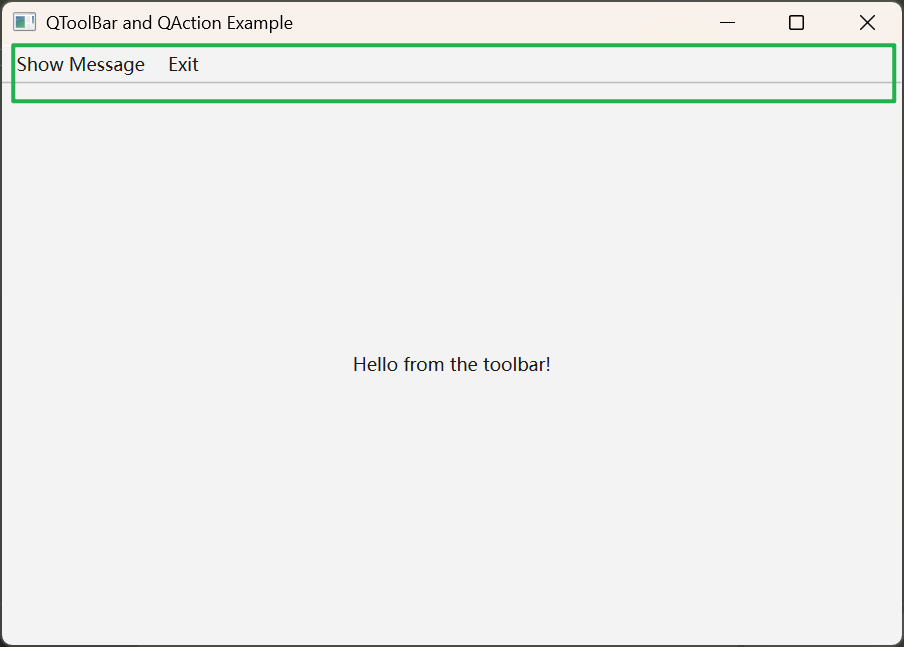
工具栏QToolBar&QAction
QToolBar类用于创建和管理工具栏,QAction类用于定义工具栏中的具体操作(如按钮、菜单项等)。可以将不同的操作按钮添加到工具栏中,用户点击这些按钮时会触发相应的操作。
- 创建工具栏:通过
QToolBar创建工具栏。 - 创建操作:使用
QAction创建工具栏的按钮或其他操作。 - 将操作添加到工具栏:通过
addAction()将QAction添加到QToolBar(可以在qtdesigner中进行操作)。 - 连接槽函数:通过
triggered.connect()将操作与槽函数连接,使其在触发时执行相应操作。
from PySide6.QtWidgets import QApplication, QMainWindow, QToolBar, QVBoxLayout, QPushButton, QWidget, QLabel
from PySide6.QtGui import QAction  # 这里修正了导入路径
from PySide6.QtCore import Qt

class MainWindow(QMainWindow):
    def __init__(self):
        super().__init__()

        # 设置窗口标题和尺寸
        self.setWindowTitle("QToolBar and QAction Example")
        self.setGeometry(100, 100, 600, 400)

        # 创建一个QLabel,用于显示消息
        self.label = QLabel("Welcome!", self)
        self.label.setAlignment(Qt.AlignCenter)
        self.setCentralWidget(self.label)

        # 创建工具栏
        self.tool_bar = QToolBar("Main Toolbar", self)
        self.addToolBar(self.tool_bar)  # 将工具栏添加到主窗口

        # 创建第一个QAction,用于显示消息
        self.action_show_message = QAction("Show Message", self)
        self.action_show_message.setShortcut("Ctrl+M")  # 设置快捷键
        self.action_show_message.triggered.connect(self.show_message)  # 绑定槽函数

        # 创建第二个QAction,用于退出应用
        self.action_exit = QAction("Exit", self)
        self.action_exit.setShortcut("Ctrl+Q")  # 设置快捷键
        self.action_exit.triggered.connect(self.close)  # 绑定关闭窗口的槽函数

        # 将QAction添加到工具栏
        self.tool_bar.addAction(self.action_show_message)
        self.tool_bar.addAction(self.action_exit)

        # 设置工具栏按钮的可见性
        self.tool_bar.setMovable(False)  # 禁止工具栏被移动

    def show_message(self):
        """当点击 'Show Message' 按钮时,更新标签内容"""
        self.label.setText("Hello from the toolbar!")

if __name__ == "__main__":
    app = QApplication([])
    window = MainWindow()
    window.show()
    app.exec()